You do not need a wheel to make a pot. You need clay, your hands, a table and — eventually — access to a kiln. Everything else is optional, and the first pot most people make by hand is better than the first pot most people throw.
From the studio: My first coiled pot took two hours and looked like it. The walls wandered, the rim was a wave, and I nearly threw it in the reclaim bucket. I fired it instead, and it has held pencils on my desk for years. It is a much better reminder of where I started than anything I could have bought.
What you need
- Clay — a mid-fire stoneware with fine grog is the most forgiving. Where to buy clay for pottery covers what to ask for.
- A work surface — a wooden board, a piece of drywall, or canvas over a table.
- Water, in a small bowl.
- A needle or a knife, and something with a serrated edge for scoring — a fork works.
- A rib or a smooth spoon, for compressing surfaces.
- Access to a kiln, at the end. Community studios will usually fire your work for a fee.
Step 1: Wedge the clay
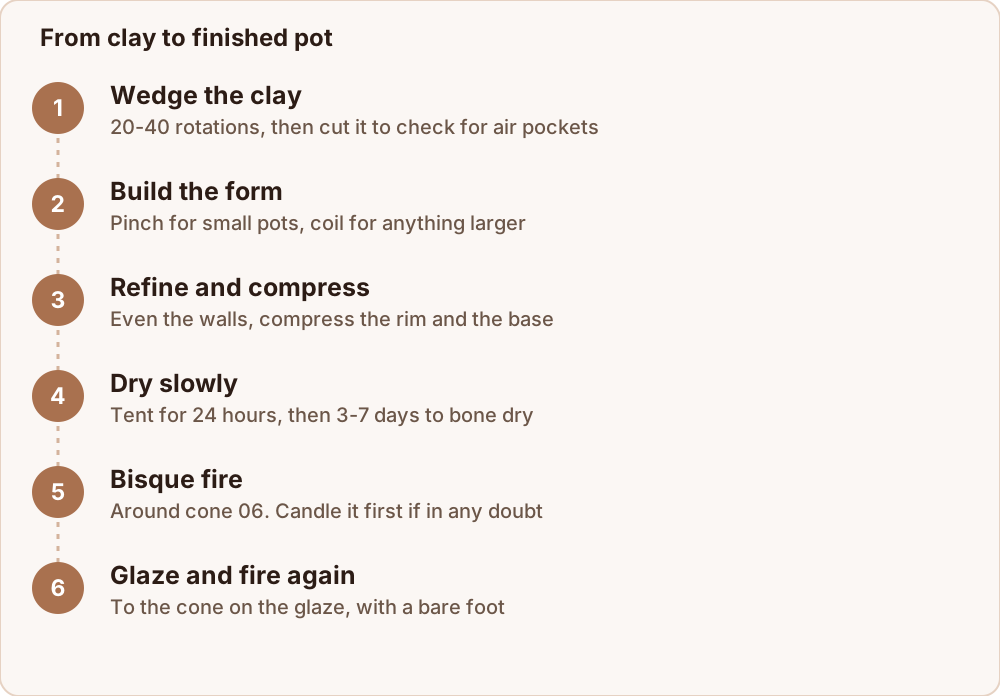
Cut off a fist-sized lump, about 500 g. Wedge it 20 to 40 rotations to make the moisture uniform and drive out air. Cut the ball in half with a wire and look at the cut face: it should be featureless, with no voids or streaks.
The full method, and both wedging styles, is in wedging clay properly.
Step 2: Build the form
The pinch method — for anything cup-sized
Roll the clay into a genuinely round ball with no folds. Press your thumb into the centre, stopping about 1.5 cm from the bottom. Then pinch in rings: thumb inside, fingers outside, squeeze gently and rotate a small step, completing a full rotation at one height before moving up.
Twenty light rotations beat five hard ones. The full sequence is in the pinch pot guide.
The coil method — for anything larger
- Make a base. Roll a slab about 8 mm thick and cut a circle.
- Roll coils. Start with a sausage and roll it out with flat palms, moving your hands apart as you go. Aim for the thickness of your thumb, and keep them even.
- Attach the first coil. Score the edge of the base, add a little slip, press the coil on and blend the join on both the inside and the outside.
- Keep stacking. Each coil scored and slipped onto the last, each join blended. Blend downwards on the inside and upwards on the outside, or the wall pulls apart.
- Shape as you go. Coils placed slightly outside the one below make the wall flare; slightly inside makes it close in.
- Let it firm up if the wall starts to sag. Fifteen minutes is usually enough, and it is far quicker than rebuilding a collapsed pot.
You can leave the coils visible as texture or blend them away entirely. Both are legitimate.
Step 3: Refine and compress
Even out the wall thickness, checking by pinching at several heights. About 8 mm everywhere is a good target — consistency matters more than thinness.
Then compress. Run a rib, the back of a spoon or a damp finger firmly over the inside, the outside, the base and especially the rim. Compression aligns the clay particles and closes the micro-voids that later become cracks. It is the cheapest insurance in pottery, and skipping it is why so many first pots crack across the base.
Step 4: Dry it slowly
This is where most first pots are lost, and it requires patience rather than skill.
- Tent the pot loosely with a plastic bag for the first 24 hours.
- Then uncover it and set it on a wire rack or a piece of drywall, so the base dries too.
- Turn it daily.
- Keep it away from radiators, sunlight and draughts.
- Wait for bone dry — the pot should feel the same temperature as the room against your cheek, not cool. Three to seven days is typical.
The reasoning behind every one of those steps is in drying pots evenly.
Step 5: Bisque fire
The first firing, usually to around cone 06. It drives off the chemically bound water and turns the clay permanently into ceramic — hard, but still porous, which is exactly what makes it accept glaze.
If you are firing yourself and the pot is thick, hold the kiln at 90 to 100 °C for a few hours first with the vents open. That candling stage drives off any remaining free water gently, well below the point where steam can break the pot apart.
Step 6: Glaze and fire again
Wipe the bisque with a damp sponge, let it dry, then dip, pour or brush your glaze. Aim for a coat about the thickness of a postcard, and wipe the foot completely bare — any glaze touching the shelf fuses the pot to it permanently.
Fire to the cone printed on the glaze, which must also be within your clay body's range. The whole application sequence is in how to glaze pottery at home.
What to expect from a first pot
It will be heavier than a shop-bought pot. The walls will vary. The rim will not be perfectly level. All of that is normal, and none of it stops the pot working.
The two things worth actually aiming for are even wall thickness and a compressed rim and base. Get those right and the pot will survive drying and firing, which is more than half the battle.
Where to go next
For the small-scale version of this, the pinch pot guide goes deeper on wall control. If the pot cracked, drying pots evenly will tell you why from the shape of the crack. And when you are ready for the wheel, centering clay is the first real hurdle.
