If you make ten pots and three crack, the drying stage is where it happened. Throwing and firing get the blame because that is when you notice, but a crack in the bisque was almost always initiated by a moisture gradient days earlier.
From the studio: I lost four large platters in a row to warping before I noticed the studio door was directly in line with my drying shelf. One side of every piece was drying in a draught. Moving the shelf two metres solved a problem I had spent a month blaming on my throwing.
The mechanism, once more
Clay shrinks as it loses water — around 5–8% from wet to bone dry, then another 5–7% in the firing. If one part of a piece reaches its dry size before an adjacent part does, the drier part is in tension. Clay's tensile strength is negligible. It tears.
Everything below is a way of making the whole piece dry at once.
Where uneven drying comes from
Airflow. The side facing the open room dries far faster than the side facing the wall. A draught from a door or a window is the classic cause of a one-sided warp.
Thickness. A thick base under thin walls dries slowest and finishes last, pulling against walls that already shrank.
The surface it sits on. A pot on a nonporous table dries everywhere but the base. On plaster or drywall the base dries with everything else.
Attachments. Handles, spouts, lugs and rims are thin and exposed. They finish long before the body.
The routine that works
- Compress everything as you make it. Ribs on walls, a firm rib on the floor of thrown pots, a wet finger on rims. Compression is drying insurance you buy in advance.
- Cover loosely for the first 24 hours. A dry-cleaning bag, a plastic sheet, or a damp box. Not sealed — you want slow drying, not zero drying.
- Dry on a porous board. Plaster bats, drywall offcuts or bare wood all draw water from the base. Never leave a pot on a plastic or metal shelf.
- Cover thin parts selectively. Small strips of plastic or foil over handles and rims hold them back so the body can catch up. This trick alone fixes most handle cracks.
- Turn pots upside down at leather-hard. Once the pot is stiff enough to sit on its rim safely, invert it. The base gets air and the rim, which is well ahead, gets slowed.
- Give everything the same environment. Not one shelf by the radiator and one by the window.
- Wait for bone dry, then wait one more day. Especially with large or thick work.
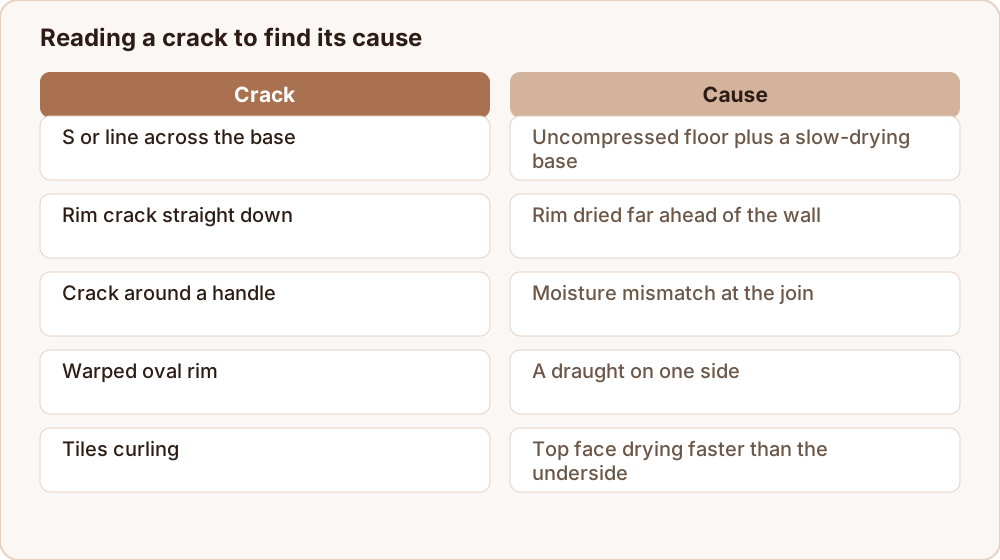
Reading the cracks
| Crack | Where | Cause |
|---|---|---|
| S or line across the base | Thrown pots | Uncompressed floor plus slow-drying base |
| Rim crack, straight down | Any | Rim dried far ahead of the wall |
| Crack around a handle | Mugs | Moisture mismatch at the join |
| Warped oval rim | Thrown pots | Draught on one side, or lifted off the bat while soft |
| Flat pieces curling | Tiles, slabs | Top face drying faster than the face on the board |
| Crack through the wall thickness | Large forms | Thickness variation across the wall |
Tiles deserve a note of their own: they are the hardest thing to dry flat. Sandwich them between two boards with a sheet of newspaper on each face, add a light weight, and flip the stack daily. Anything less and they potato-chip.
Slow candling makes up for a lot
If a piece is important, or big, or you are not certain it is dry, start the bisque with the kiln held at 90–100 °C for three to six hours with the lid propped or the vents open. That drives off the last free water gently, below the temperature where steam pressure can do damage. It costs a little electricity and saves work you cannot replace.
Building a drying setup that works
Most studios solve this with three cheap things rather than any equipment.
Drywall offcuts. A builder's merchant will sell you a sheet for very little, and a saw turns it into a stack of bats. Drywall draws moisture out of the base at roughly the rate air pulls it from the sides, which is exactly the balance you want. Wooden boards work almost as well.
A dry-cleaning bag or a plastic sheet. Not sealed around the pot, just draped over the shelf. This is the single most useful item in the list, because it slows the first day without stopping the drying.
A damp box. A plastic storage box with 3 cm of plaster set in the bottom, kept slightly wet. Work put inside holds its moisture for days, and a piece that has stiffened too far comes back down overnight. If you cannot make one, a sealed box with a damp cloth inside — not touching the clay — is close enough.
Arrange the shelf away from doors, windows and radiators, and give every piece the same conditions. The most common cause of a warped rim I see is one shelf getting a draught the potter never noticed, which is worth checking before you blame anything you did at the wheel.
Where to go next
Cracks that appear around attachments are join problems rather than drying problems — see score and slip joins. To place your piece correctly on the stage timeline, read the stages of clay. And if you are working in air-dry clay rather than pottery clay, why air-dry clay cracks covers the same physics with different materials.
