Homemade modelling clay is genuinely useful for children, for quick decorative pieces and for practising form. It is not pottery clay and it will never behave like it — there are no clay minerals in any of these recipes, so nothing here can be fired.
From the studio: Cold porcelain caught me out with its shrinkage the first time — I made a set of flowers to a careful size and they came out noticeably smaller and slightly warped. Now I make everything about a fifth larger than I want it to end up.
With that clear, three recipes, from coarsest to finest.
1. Salt dough — cheapest, best for children
Ingredients
- 2 cups plain flour
- 1 cup fine salt
- 1 cup water, roughly
Method
- Mix the flour and salt thoroughly in a bowl.
- Add water a little at a time, mixing as you go, until it comes together as a firm dough. Add water sparingly — it goes sticky fast.
- Knead on a floured surface for five minutes. It should be smooth and elastic and not stick to your hands.
- Use immediately, or wrap airtight and refrigerate for up to a week.
Drying: air dry for one to three days depending on thickness, or oven dry at about 100 °C for two to three hours. Low and slow is essential; a hot oven puffs and browns it.
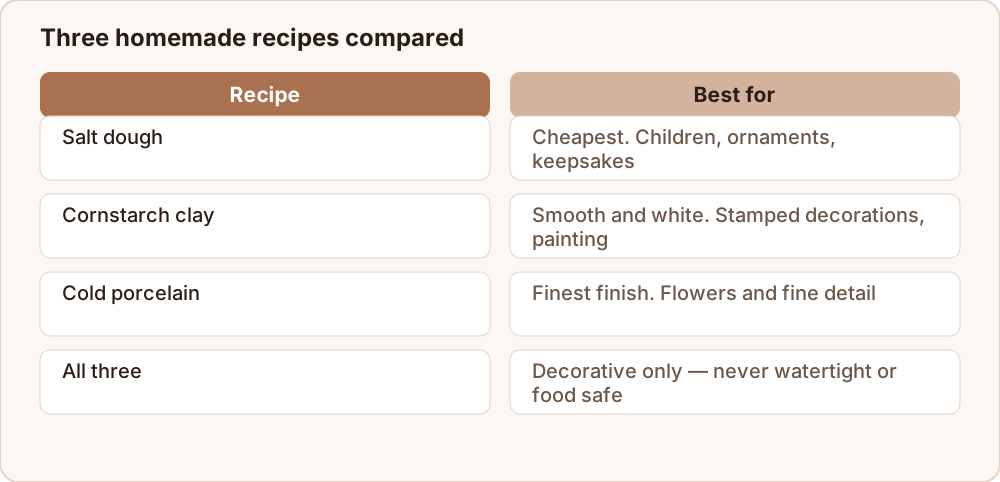
Good for: ornaments, handprints, keepsakes, anything a child makes in an afternoon.
Not good for: fine detail, anything thick, or anywhere damp. Salt dough absorbs moisture from the air and will soften or grow mould if unsealed. Seal both sides with acrylic varnish.
2. Cornstarch clay — smooth, white, no cooking
Ingredients
- 1 cup cornstarch (cornflour)
- 1 cup bicarbonate of soda
- 3/4 cup water
Method
- Combine everything in a saucepan over medium heat.
- Stir constantly. It will look like thin milk for a minute or two, then thicken suddenly into something like mashed potato. That transition happens fast — keep stirring.
- Remove from the heat as soon as it holds together in a mass.
- Turn out onto a plate, cover with a damp cloth, and let it cool to handling temperature.
- Knead until completely smooth.
Drying: 24 to 48 hours in air for thin pieces.
Good for: smooth white ornaments, stamped decorations, pieces you want to paint. It takes fine impressions well and dries a clean bright white.
Not good for: anything structural. It is brittle when dry and cracks if pieces are thick or dried too fast.
3. Cold porcelain — the finest finish
Ingredients
- 1 cup cornstarch
- 1 cup white PVA glue
- 2 tablespoons baby oil or mineral oil
- 1 tablespoon lemon juice or white vinegar (a preservative)
Method
- Mix everything in a non-stick pan over low heat.
- Stir constantly until it thickens and pulls away from the sides in a single lump. This takes several minutes and there is no shortcut.
- Turn out onto a surface greased with a little oil, cover with a damp cloth, and cool until you can handle it.
- Knead for five to ten minutes with oiled hands until it is silky and elastic.
- Store wrapped in cling film inside an airtight container. It keeps for weeks.
Drying: 24 hours to several days. It shrinks noticeably as it dries — around 10 to 20 percent — so make pieces slightly larger than the final size you want.
Good for: flowers, delicate ornaments, fine detail. It dries hard, semi-translucent and takes a lovely finish. Colour it by kneading in a little acrylic paint or oil paint while it is soft.
Not good for: thick pieces, which crack, and anything that will be handled roughly.
Colouring and finishing
Colour by kneading in acrylic paint, food colouring or powdered pigment while the clay is soft — the colour goes right through, so chips do not show white.
Once fully dry, sand lightly with fine paper and seal with two or three thin coats of acrylic varnish, including the underside. Sealing is what determines whether the piece survives a year or a decade.
What none of these can do
They cannot hold water, they are not food safe, they cannot go in a dishwasher, and they cannot be fired. Kilns reach 1000 °C and above, which would simply carbonise flour, salt and glue.
If you want something that genuinely holds liquid, you need real ceramic clay and access to a kiln, or a commercially made air-dry clay sealed thoroughly — and even then, sealed air-dry clay is decorative rather than functional.
Working with the homemade versions
These recipes handle differently from shop-bought clay, and a few habits make them much more pleasant.
Keep your hands and tools lightly oiled for cold porcelain, and lightly floured for salt dough. Both stick otherwise.
Work small. All three recipes are weakest in thick sections, so build over a foil core for anything more than a couple of centimetres thick.
Roll between guide sticks. Two strips of wood of equal thickness either side of the clay give you an even slab every time, which matters more here than with pottery clay because these recipes crack readily at thickness changes.
Join with water, not slip. A damp brush along both faces and firm pressure is enough for salt dough and cornstarch clay. For cold porcelain, a smear of PVA works better.
Store the excess airtight. Cold porcelain keeps for weeks wrapped in cling film inside a sealed box. Salt dough keeps about a week in the fridge. Cornstarch clay dries fastest and is best made in the quantity you will use that day.
Dry slowly, tented for the first day, exactly as with any air-dry material.
Where to go next
For hardening and sealing whatever you make, see how to harden modelling clay. If you want something more durable, is modeling clay the same as polymer clay compares the shop-bought options. And firing clay without a kiln explains why none of these can be fired.
