Air-dry clay cracks for one reason: the outside shrinks before the inside does. Everything else — thin lips, thick bases, radiators, fans, joins that open up overnight — is a variation on that theme. Once you see cracking as a moisture-gradient problem rather than a clay-quality problem, the fixes get obvious.
From the studio: The pot that finally taught me this was a slab box I left half-built overnight. The base had gone firm and the walls were still soft, and by morning there was a hairline crack running the length of every seam. Nothing was wrong with the clay. I had simply built one object out of two different moisture levels.
What is actually happening
As water leaves clay, the particles pull closer together and the piece shrinks. Air-dry clay typically shrinks 5–8% by volume. If the surface loses water in two hours and the core takes two days, the skin is trying to occupy a smaller volume than the wet mass underneath it. Something has to give, and clay has almost no tensile strength, so it tears.
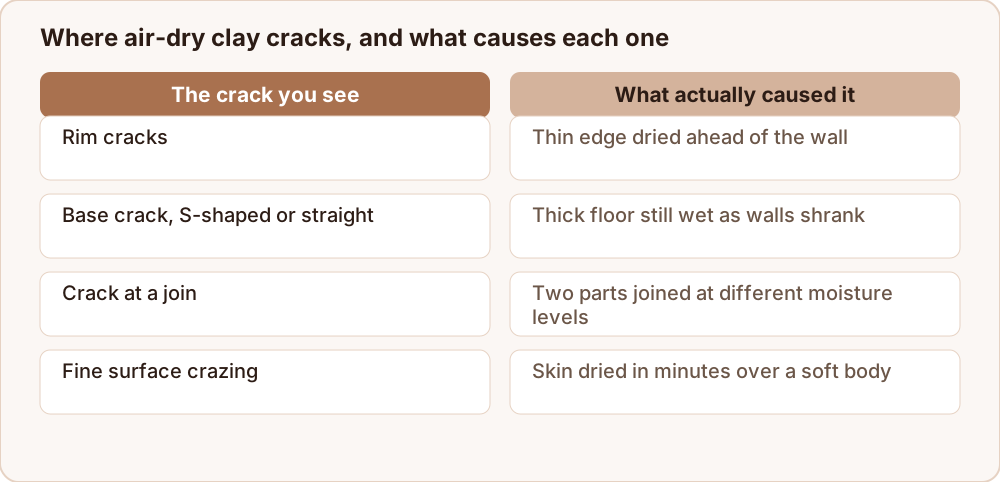
That tearing shows up in predictable places:
- Rim cracks — thin edges dry first and pull against a wetter wall.
- Base cracks (an S or a straight line) — a thick floor holds water while the walls tighten around it.
- Join cracks — two pieces at different moisture levels shrink by different amounts.
- Surface crazing — a skin that dried in minutes over a soft body.
The five fixes, in order of impact
1. Keep the wall thickness even
Consistency beats thinness. A piece that is 8 mm everywhere dries better than one that runs from 3 mm at the rim to 20 mm at the base. Aim for 6–10 mm and check by pressing a needle through a scrap area or by feel.
2. Hollow anything thick
Solid forms thicker than about 2.5 cm are asking for it. Build over a crumpled paper or foil armature, or build two halves and join them. A hollow form dries from both faces and the gradient stays shallow.
3. Slow the first 24 hours
This is the single highest-leverage habit. Tent the piece loosely with a plastic bag — not sealed, just a lid on the airflow — for the first day, then uncover it. You are not stopping the drying, you are letting the core catch up.
Never dry near a radiator, in direct sun, or in front of a fan. Heat accelerates the surface only.
4. Turn the piece
A pot sitting on a nonporous table dries everywhere except the base. Set work on a wire rack, a wooden board, or a piece of drywall, and flip or rotate it once a day. Drywall in particular pulls moisture out of the base at roughly the rate the air pulls it from the sides.
5. Join wet to wet
Never attach a soft coil to a leather-hard wall. Bring both parts to the same stiffness, score both faces with a needle or a serrated rib, wet them, and press until a small bead of clay squeezes out. Blend that bead in — a join that only touches is a crack waiting to open.
Repairing what has already cracked
Small hairlines are cosmetic and fillable. Structural cracks through a wall are worth repairing properly:
- Widen the crack into a shallow V with a needle tool. A filled hairline pops back open; a filled V has something to grip.
- Dampen both faces with a wet brush and wait a minute for the water to soak in.
- Press in a slurry of the same clay mixed to a thick toothpaste. For a stronger repair, mix in a few drops of PVA glue — this is not cheating, air-dry clay is already a polymer-bound body.
- Overfill slightly, tent under plastic, dry slowly, then sand flush with 220-grit once bone dry.
Two habits that prevent almost everything
Compress every surface you make. Run a rib, the back of a spoon, or a damp finger firmly over rims, bases and joins before they stiffen. Compression aligns the clay particles and closes micro-voids that later become crack origins.
Finish the piece in one session, or wrap it. Clay left half-built overnight becomes a two-moisture object. If you must stop, wrap the whole thing airtight and let it equalise for a few hours before you carry on.
When it is not your technique
Old air-dry clay that has been opened and re-bagged loses binder and dries short and crumbly. If a fresh block behaves and the old one does not, it is the clay. Knead a little water and a few drops of PVA into an old block before you write it off — five minutes of wedging revives most of it.
A quick pre-flight check
Before you set a piece down to dry, thirty seconds of checking prevents most losses.
- Pinch the wall at three heights. Rim, middle and base should feel the same. If the base is double the rim, thin it now while you still can.
- Look for a thick spot. Anywhere solid over about 2.5 cm should be hollowed or built over a core.
- Run a wet finger round the rim, firmly. Rims tear first, and compression is what stops it.
- Check every join for a blended bead of clay. A join that only touches is a crack that has not happened yet.
- Is anything thin and sticking out? Wrap it in a scrap of plastic before you cover the piece.
- Where is it going to sit? Wire rack or drywall, not a plastic table, and not near a radiator or a window.
That list takes less time than making a cup of tea, and it catches the four faults responsible for nearly every crack described above.
Where to go next
If your piece is thicker than a couple of centimetres, read how to build hollow with pinch pots before you start the next one. If the crack appeared where two parts meet rather than in open wall, the problem is the join, and score and slip joins covers it properly. And if you are weighing up air-dry against the alternatives, is modeling clay the same as polymer clay lays out what each material can and cannot do.
