Glazing is the step where a lot of otherwise good pots are lost, almost always for the same three reasons: a dirty surface, uneven thickness, or glaze left on the foot. Get those right and the rest is straightforward.
From the studio: I once welded a bowl to a kiln shelf because I wiped the foot with a sponge I had not rinsed. The sponge was carrying enough glaze to bridge the gap. Now I rinse the sponge between every pot and run a dry finger round the foot as a final check, which takes about four seconds and has never failed me since.
You need a kiln for this. Glaze does not set, cure or dry hard — it melts, at somewhere between 1000 and 1280 °C. If you do not have a kiln, community studios will usually fire glazed work for a fee.
Before you open the glaze
Start with bisque ware. Raw greenware dissolves the moment it hits a glaze bucket. Bisque is porous, which is exactly what makes dipping work: the pot sucks water out of the glaze and leaves an even deposit of glaze material behind.
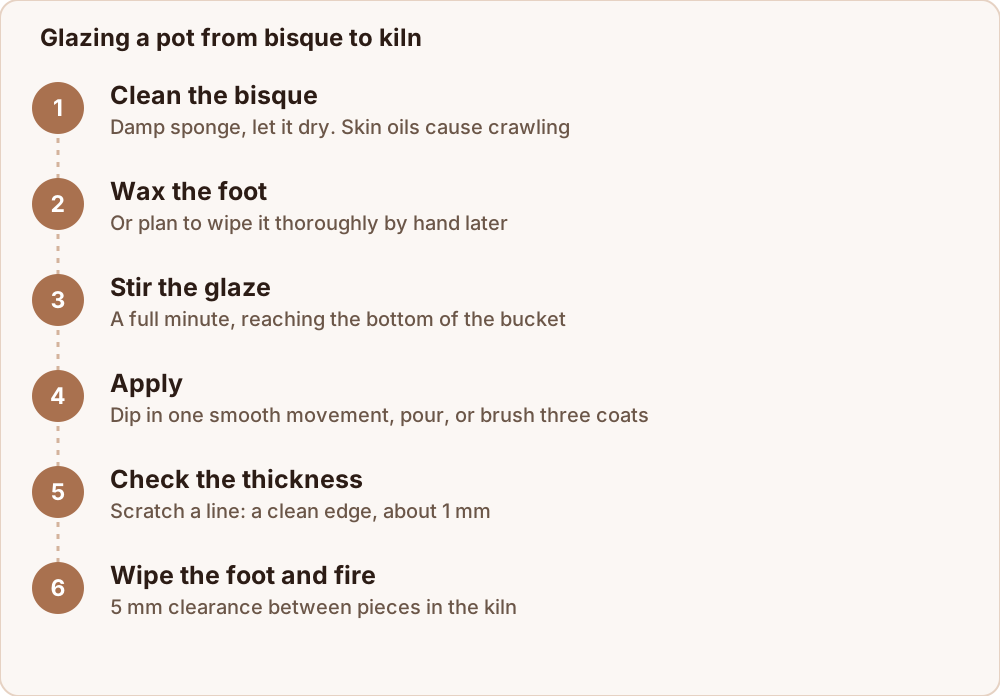
Clean it. Wipe every surface with a barely damp sponge and let it dry. Skin oils from carrying bisque are a leading cause of crawling — bare patches where the glaze pulled away from the clay.
Sand sharp edges with a fine mesh pad, then wipe again. Glaze thins at sharp edges and will show every rough spot.
Wax the foot if you have wax resist. Paint it on the bottom and 3 mm up the sides, and let it dry. It saves the wiping step later. Without wax, you will wipe the foot clean by hand afterwards — do it thoroughly, because any glaze on the base fuses the pot to the shelf.
Preparing the glaze
Stir it properly. Glaze settles hard. The heavy fluxes sink to the bottom, so an unstirred bucket applies a different recipe from the top than from the middle. Stir for a good minute, reaching the bottom, until there is no sludge left.
Check the consistency. Dip a finger in: it should coat like single cream and you should just be able to see your fingerprint through it. Commercial jarred glazes usually arrive at working consistency; studio buckets often need a little water after sitting.
Sieve it through 80 mesh if it has been standing for weeks, or if you can feel lumps.
Three ways to apply it
Dipping — fastest and most even
Hold the pot with glaze tongs or your fingertips, submerge it in one smooth movement, count to two or three, and lift it out.
Speed of the dip matters less than consistency. A pot that goes in and out in one movement gets an even coat; one that hesitates halfway gets a line. Shake off the drips, and touch up the tong marks with a brush once the surface is dry.
Three seconds is a starting point on standard bisque, not a rule. Very porous bisque takes glaze fast — try two.
Pouring — for insides and large pieces
Fill a jug, pour glaze into the pot, swirl it once to coat the interior, and pour it back out in one motion. Then pour over the outside while rotating the pot over the bucket, or dip the outside separately.
Glaze the inside first and let it dry before doing the outside. Doing it in the other order soaks the piece and the second coat will not adhere.
Brushing — for jarred glazes and detail
Brushing glazes are formulated with gums that make them flow off a brush and stay put. Apply three coats, each in a different direction, letting each lose its shine before the next. One or two coats of a brushing glaze is the most common cause of a thin, dry, disappointing result.
Do not brush a dipping glaze. Without the gum it drags and streaks.
Check the thickness
Scratch through with a fingernail on an inconspicuous spot. You want a clean line showing bisque with a definite edge. Too thin and the fired glaze will be patchy and dry; too thick and it will run, crawl or blister.
If it is too thin, let the piece dry completely and dip again briefly. If it is too thick, wash the whole thing off under a tap, let it dry, and start over. Glaze is entirely recoverable at this stage.
The foot
Every surface that touches the shelf must be bare clay. Wipe the foot with a damp sponge, rinsing the sponge often, until nothing is left. Then run a dry finger around it to check.
If you used wax resist, the glaze will have beaded off, but still wipe — beads bridge the gap and fuse.
Leave 3 to 5 mm of unglazed clay above the foot on anything with a runny glaze. That margin is the difference between a pot you can lift off the shelf and a grinding job.
Firing
Load with at least 5 mm between pieces, more for glazes that run. Glazed surfaces that touch in the kiln fuse permanently.
Fire to the cone on the glaze label, not the cone your clay is rated for, and never higher than the clay body's maximum. Use witness cones on the shelf if you can — a controller reads the thermocouple, not the actual heat work in that corner of the kiln.
Let the kiln cool on its own to below 100 °C before opening. Cracking the lid early gives you thermal shock and, on some glazes, a crazed surface that would otherwise have been fine.
Where to go next
If the result came out patchy or beaded, glaze crawling is the diagnostic post. To understand why the cone on the label matters so much, read what is ceramic glaze made of and cone 6 vs cone 10. And if you are buying rather than mixing, where to buy pottery glaze covers the formats.
