Mixing glaze is weighing powders into water. It is not difficult, but it is unforgiving of sloppiness — a recipe is a set of ratios, and small errors compound into a glaze that behaves nothing like the one in the book.
From the studio: The best habit I ever picked up was ticking off each line of the recipe with a pencil as it went into the bucket. I lost a 10 kg batch once to a doubled silica addition that I could not detect until the tiles came out dry and unmelted, and a pencil mark would have caught it in a second.
What you need
- A digital scale to 1 g for a 5 kg batch, plus a jeweller's scale to 0.1 g for colourants.
- Buckets with tight lids, ideally in a size that leaves headroom for blending.
- An 80-mesh sieve and a stiff brush to push material through.
- A respirator rated for fine particulates — a paper dust mask is not adequate for silica.
- A dedicated surface you can wipe down wet.
Safety first, because this part is real
Glaze materials are dry mineral powders. The main hazard is silica dust, which causes irreversible lung disease with long-term exposure. Barium, lithium, manganese and several colourants carry their own risks.
The rules are simple and non-negotiable:
- Wear a fitted respirator whenever a powder is open.
- Mix in a ventilated space, ideally not your kitchen.
- Never sweep or dry-brush. Sweeping puts settled dust back in the air. Wet-mop or use a HEPA vacuum.
- Wipe surfaces down wet at the end of every session.
- Keep food, drink and children out of the space.
None of this makes glaze mixing dangerous in itself. Ignoring it over years is what causes harm.
Reading a recipe
A glaze recipe is written in percentages that add to 100. Colourants and additives sit outside that total and are written as "plus" amounts.
Satin White — [cone](/blog/cone-6-vs-cone-10) 6
Custer feldspar     40
Silica              22
Whiting             14
EPK kaolin          14
Talc                10
                   ---
                   100
+ Zircopax           8
+ Bentonite          2
To make a batch, pick a total dry weight and treat percentages as grams. 5000 g total means 2000 g of feldspar, 1100 g of silica, and so on. That is the whole calculation.
Mixing, step by step
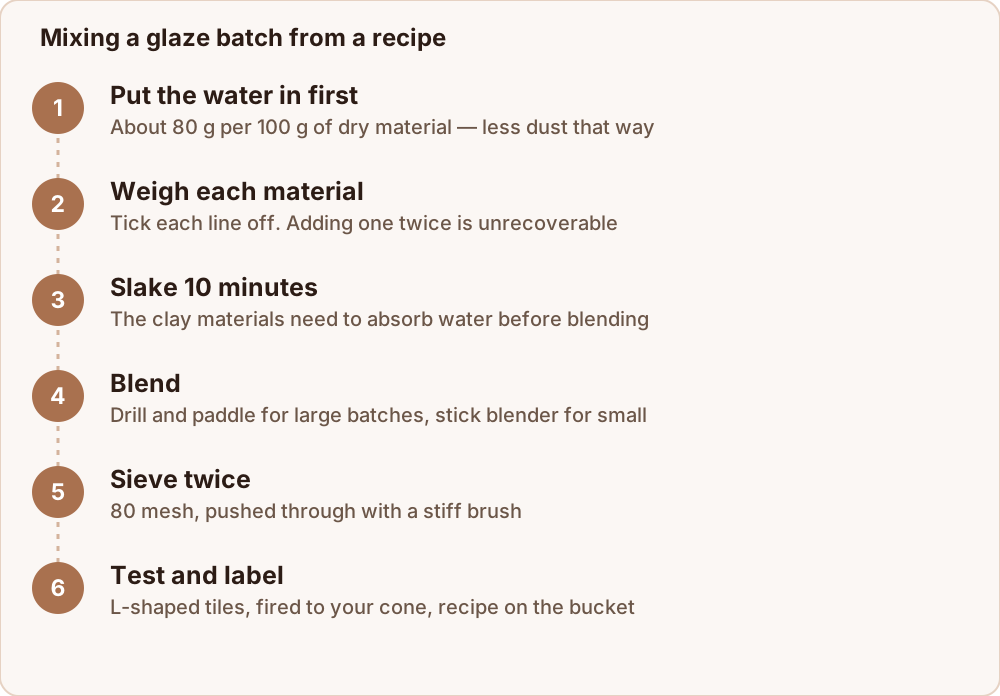
- Weigh the water first. Roughly 80 g of water per 100 g of dry material is a good starting point for a dipping glaze. Put it in the bucket before the powders — adding water to dry powder creates far more airborne dust.
- Weigh each material and add it. Tick each line off the recipe as you go. Getting distracted and adding silica twice is the classic failure, and it is unrecoverable.
- Add bentonite differently. It clumps stubbornly. Mix it dry with a scoop of another powder before it goes in.
- Let it slake for 10 minutes. The clay materials need to absorb water before blending.
- Blend. A drill with a paddle for large batches, a stick blender for small ones.
- Sieve twice through 80 mesh, pushing material through with a brush. This is not optional — unsieved glaze gives speckles, pinholes and blisters.
- Adjust the water. Aim for single cream, thin enough that you can just see your fingerprint through a coating on your finger. Add water in small increments; you cannot easily take it out.
- Label the bucket with the recipe name, the cone and the date, in permanent marker.
Test before you trust it
Dip test tiles, fire them to your cone, and look at them properly before glazing thirty pots.
A good test tile is L-shaped or bent, so it shows both a vertical and a horizontal surface. Vertical tells you whether the glaze runs; horizontal tells you how it pools. Dip one end twice to show the effect of double thickness.
Check for:
- Running — did it move down the vertical face?
- Crazing — a fine crack network, visible when you rub ink into the surface and wipe it off.
- Pinholes and blisters — usually too thick, fired too fast, or unsieved.
- Fit — does it flake at the edges (shivering) or craze?
Adjusting
- Too glossy — increase alumina, usually by adding kaolin, in 2 percent increments.
- Too matt or dry — the melt is insufficient; increase the flux or reduce silica slightly.
- Crazing — the glaze contracts more than the body. Increase silica or reduce the high-expansion fluxes (sodium and potassium).
- Running — increase alumina and silica, or apply it thinner.
Change one thing at a time, and record every change with its test tile. A binder of tiles with recipes on the back is the single most valuable thing in a glaze studio.
Storage
Sealed buckets keep indefinitely. Glaze settles hard — a bucket untouched for six months will have a solid layer of flux at the bottom, so stir all the way down before every use. If a batch has dried out, add water and re-sieve rather than throwing it away. Nothing about a mixed glaze goes off.
Where to get recipes worth mixing
A recipe is only as good as its testing, and there is a lot of untested material circulating.
Published collections. Books and the ceramics magazines publish recipes that have been fired by more than one person. Start there.
Supplier recipes. Many suppliers publish recipes formulated around materials they actually stock, which removes the substitution problem entirely.
Studio recipes. If you work in a shared studio, their buckets have been fired hundreds of times in the kiln you are using. That is more valuable than any published recipe.
Online forums and social media. Treat with care. Materials vary by region and by brand, and a recipe that works with one supplier's feldspar may not with another's.
Two cautions worth carrying into any recipe. First, check what is in it before you mix it — barium carbonate, lithium compounds and some colourants have real handling and food-safety implications. Second, a recipe is a starting point, not a result. Your kiln, your schedule, your clay body and your application thickness all change what comes out, which is why the test tile always comes before the batch.
Where to go next
The chemistry behind those adjustments is in what is ceramic glaze made of. For application once it is mixed, see how to glaze pottery at home. And if you would rather buy than weigh, where to buy pottery glaze compares the formats.
