Coloured slip is the cheapest decoration in ceramics. You already have the clay, and a small pot of stain will colour litres of it.
From the studio: My first black slip came out of the kiln a disappointing chocolate brown, because I had used iron oxide alone and trusted how dark it looked in the bucket. Wet colour tells you almost nothing. Now nothing gets used on real work until a tile with the recipe carved into the back has been through the kiln.
The catch is that you cannot judge the result by eye while it is wet. Raw cobalt carbonate is a dull grey powder that fires an intense blue; a slip that looks convincingly black in the bucket can fire a disappointing brown. Everything below is aimed at making that predictable.
Start with the right base
Colour behaves like paint on paper: what is underneath changes what you see.
- White slip — made from a white body, porcelain scrap or a ball clay and kaolin blend. Colours read true and bright.
- Buff or red slip — made from your ordinary stoneware or terracotta scrap. Colours mute and warm, and pale stains may barely register.
For anything other than earth tones, mix a white base and colour that. Keep a bucket of it.
The base slip must still shrink like the clay it goes on, so if you are decorating a stoneware pot with a porcelain slip, test it before making twenty of them.
Weigh the dry ingredients, not the wet slip
This is the whole discipline. Percentages in ceramics are always by dry weight of the batch, so measuring into an already-wet bucket makes results impossible to repeat.
The reliable method:
- Weigh out dry base slip ingredients, or work out the dry clay content of a batch you already have by weighing a sample, drying it fully and weighing it again.
- Weigh the colourant as a percentage of that dry weight.
- Blend, sieve through 80 mesh, and write the recipe on the container with masking tape.
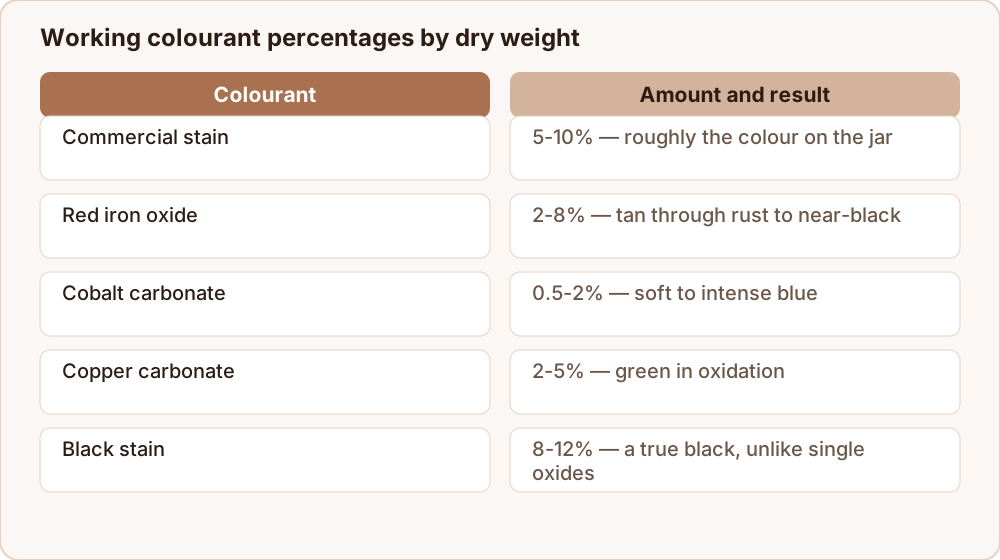
Working percentages
| Colourant | Amount by dry weight | Fires to |
|---|---|---|
| Commercial stain | 5–10% | The colour on the jar, roughly |
| Red iron oxide | 2–8% | Tan through rust to near-black |
| Cobalt carbonate | 0.5–2% | Soft to intense blue |
| Copper carbonate | 2–5% | Green in oxidation |
| Manganese dioxide | 3–8% | Brown to purple-brown |
| Rutile | 3–8% | Cream, tan, variegation |
| Black stain | 8–12% | Black |
| Nickel oxide | 1–3% | Grey-green, muted |
Stains are more expensive than raw oxides but far more predictable, because they are already fired, ground and stabilised. If you want a specific colour rather than an interesting one, buy the stain.
Making black slip
Black is the one people struggle with, because most single colourants give a very dark brown rather than a true black. Two approaches work:
- A commercial black stain at 8 to 12 percent. Simple, consistent, and the safest choice for functional work.
- A blend of oxides — a classic mix is roughly 4 parts red iron oxide, 2 parts manganese dioxide, 1 part cobalt carbonate, added at around 10 percent total. Deep and slightly variable.
Manganese releases fumes in the firing that you do not want to breathe. Ventilate the kiln properly, and be aware that heavy manganese slips are not a good choice for food surfaces.
Mix it properly
Powdered colourants are much finer than clay and clump instantly in water. Blend the dry powder into a small quantity of water first to make a smooth paste, then stir that into the slip rather than tipping the powder into the bucket.
Then sieve twice through an 80-mesh screen. Unsieved colourant leaves speckles — which can be lovely, and is a disaster if you did not intend it.
Wear a mask while handling dry powders. Metal oxide dust is genuinely harmful, and the particles are small enough to stay airborne for a long time.
Test before you commit
Make a test tile for every colour, and make it properly:
- Brush on one, two and three coats side by side, so you can see how the colour builds.
- Cover half the tile with your clear glaze and leave the other half bare.
- Fire to the cone you actually use.
- Write the recipe on the back in underglaze pencil or by carving it into the clay before firing. Pencil on bisque burns off.
Pin the tiles to a board. A wall of tested tiles is worth more than any recipe book, because it shows results in your kiln with your materials.
Applying it
Coloured slip goes onto soft leather-hard clay. Too wet and it slides; too dry and it flakes off as the clay shrinks away underneath.
Two or three thin coats give more even coverage than one thick one, and letting the surface lose its shine between coats prevents lifting. If you plan to carve back through it — sgraffito — apply a slightly thicker layer and carve once the slip has firmed but the pot is still leather-hard.
Applying it so the colour survives
Mixing a good slip and then applying it badly is the commonest way to waste the effort.
Work at soft leather-hard. Too wet and the slip slides and pools; too dry and the clay shrinks away underneath it and the slip flakes off as it dries.
Build up thin coats. Two or three thin applications give far more even coverage than one thick one. Let the surface lose its shine between coats — not dry, just no longer wet — or the second coat lifts the first.
Match the shrinkage. The slip should be made from the same clay body as the piece wherever possible. A porcelain slip on a stoneware pot is a shrinkage mismatch waiting to crack.
Test the glaze over it. A clear glaze can shift a slip colour noticeably, and a glaze containing zinc will bleach several stains outright. The half-glazed test tile described above tells you this before it matters.
Decide about sgraffito early. If you plan to carve back through the slip, apply a slightly thicker layer and carve while the slip has firmed but the pot is still leather-hard. Carving bone dry slip chips rather than cutting.
Where to go next
Start with a good base slip — how to make slip for pottery covers the consistencies. If you are layering a clear glaze on top, how to glaze pottery at home explains thickness control. And for the chemistry behind why some stains burn out at higher cones, see what is ceramic glaze made of.
