Slip is clay suspended in water. That is the entire definition, and it is worth holding onto, because most confusion about slip comes from treating it as a special material rather than as your clay with more water in it.
From the studio: For months I made slip by adding water to wet clay and wondering why it stayed lumpy no matter how long I blended it. The day someone told me to use bone dry trimmings instead, the whole thing collapsed into smooth sludge overnight with no effort at all. It is the single most useful five-second piece of advice I have been given.
What changes between uses is only the consistency and, sometimes, what you add to it.
The one rule that governs everything
Make slip from the same clay body as the piece it will touch.
Every clay body has its own shrinkage rate. A slip made from a different body shrinks by a different percentage as it dries and fires, and that difference shows up as a crack around your handle or a flake of decoration lifting off a bowl. Keep a labelled bucket of scrap for each body you use.
Start with bone dry scrap, not wet clay
Trimmings, failed pots, dust from the bottom of the bag — anything bone dry. Dry clay is full of open pores, so water rushes in and the piece collapses into mud on its own. This is called slaking, and it does the hard work for you.
Wet clay has no open pores. Dropped in water it stays a lump for hours and then blends into something stubbornly lumpy.
The method
- Break the dry clay small. Thumbnail-sized pieces or smaller. Put them in a bucket or a large yoghurt tub.
- Cover with water and walk away. Add just enough water to submerge everything. Leave it for a few hours, or overnight for larger lumps. Do not stir yet — stirring early traps dry cores inside wet balls.
- Come back to sludge. The clay will have collapsed. Pour off any clear water sitting on top.
- Blend. A stick blender is the fastest route and gives the smoothest result. Whisking by hand works. So does a drill with a paint-mixing paddle for bigger batches.
- Sieve if you want it smooth. An 80-mesh kitchen sieve catches grog, grit and unblended lumps. Skip this for joining slip; do it for anything you will paint or pour.
- Adjust the consistency. Too thin means waiting — leave it uncovered, or pour it onto a plaster bat for an hour. Too thick means adding water a splash at a time.
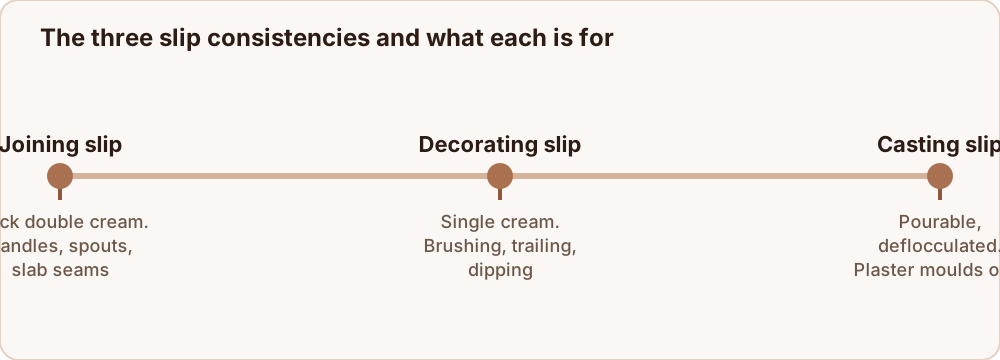
The three consistencies
Joining slip — thick double cream
For attaching handles, spouts, feet and slab seams. It should hold a peak briefly when you lift the spoon and not run off a vertical surface.
Score both faces deeply first. Slip on unscored clay is lubricant, not glue.
For a stronger join, add a spoonful of vinegar per cup of slip. The acid flocculates the clay, which makes the slip noticeably tackier. This is the cheap version of the studio recipe known as magic water.
Decorating slip — single cream
For brushing, trailing, dipping and sponging onto leather-hard work. It should coat the back of a spoon in an even layer and drip off slowly.
Apply to leather-hard clay, never bone dry. Bone dry clay drinks the water instantly, swells locally, and cracks the surface off.
Casting slip — pourable
For filling plaster moulds. This one is not simply thinner: adding water alone makes a slip that carries too much water into the mould and produces weak, warped castings.
Instead, casting slip is deflocculated. A tiny quantity of sodium silicate or Darvan — a fraction of a percent by weight — makes the clay particles repel each other, so the slip pours like single cream at a much lower water content. Add it drop by drop; overdoing it makes the slip gel and it is difficult to recover.
If you are not casting into plaster, you do not need deflocculant, and you are better off without it.
Colouring slip
Blend stains or oxides into a white or buff slip: roughly 5 to 10 percent commercial stain by dry weight for a strong colour, or 1 to 3 percent of an oxide such as red iron oxide or cobalt carbonate, which go a long way. Mix a test batch, brush it onto a scrap tile, fire it, and write the percentage on the back. Wet slip tells you almost nothing about the fired colour.
Reclaiming clay is the same process
Slip is also the middle stage of clay recycling. Slake all your scrap down to a thick slurry, pour it onto a plaster bat or a canvas-lined board, and let it stiffen to throwing consistency over a day or two. Wedge it, and it is clay again. Nothing needs to be thrown away in a pottery studio except plaster and fired ware.
Common problems
Lumps that will not blend — the clay was not fully dry, or not fully slaked. Give it another day under water before blending again.
Slip cracks off as it dries — it went onto clay that was too dry, or it was applied too thickly. Aim for the thickness of a coat of paint, and work on soft leather-hard clay.
Join fails anyway — the two parts were at different moisture levels. Slip cannot fix a moisture mismatch; only matching the stiffness of both parts can.
A skin forms on stored slip — normal. Stir it back in, or sieve if it has gone leathery.
Where to go next
The join itself has its own rules, and score and slip joins covers them. If you want colour rather than glue, how to make coloured slip gives working percentages. And for the definition and the wider vocabulary, see what is slip in pottery.
