Monster Clay is a sulphur-free, oil and wax based sculpting clay used widely in special effects, prop making and character sculpture. Its defining property is that heat, not water, controls how soft it is. Warm it and it flows; let it cool and it firms up.
From the studio: The first time I detailed a sculpt in a cold garage I could not work out why it suddenly felt so much easier. It was the temperature. Now I deliberately let a piece cool for twenty minutes before any fine work, and a fan does the job in summer.
That single fact reorganises how you work.
Softening it
The clay arrives as a solid block that is genuinely hard at room temperature.
- Microwave, in short bursts of 15 to 20 seconds, kneading between each. Overheating produces liquid clay and a hot mess, and the outside melts long before the centre softens.
- Crock pot or clay warmer, on low. The professional method for larger quantities, and the only comfortable way to get a workable pool for building up big forms.
- Heat gun or hairdryer, for softening the working surface of a sculpt in place rather than the whole block.
- Hands alone, for small amounts. Body heat does soften it, slowly.
Melted clay poured into a form and left to set makes a good starting block for a bust. It is entirely reusable, and reheating does not degrade it.
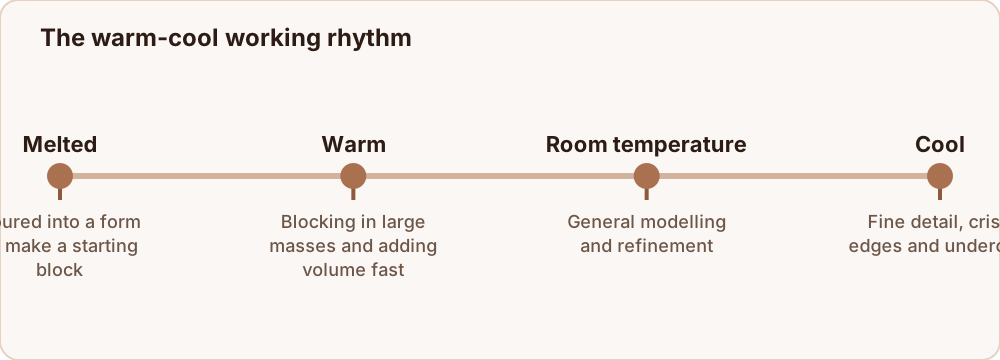
The warm-cool working rhythm
This is the technique that makes oil clay pleasant to work with:
- Warm and soft for blocking in large masses, roughing out proportions, and adding volume quickly.
- Cool and firm for detail, crisp edges, undercuts and fine texture.
So a sculpting session tends to move from warm to cool. If you need to add a lot of material to a cooled sculpt, warm just that area with a heat gun rather than reheating the whole thing.
Keeping the sculpture cool while detailing — a cold room, or a few minutes in front of a fan — makes fine work far easier.
Armatures
Anything above small scale needs a support, because oil clay is heavy and will sag under its own weight over hours.
- Aluminium wire for figures and limbs.
- Foil, foam or a turned wooden core for busts and heads, to save weight and clay.
- A sculpting stand or armature board so you can turn the piece and work from every angle.
Bulk out as much interior volume as possible with the armature. Solid oil clay is expensive and unnecessarily heavy.
Working method
Block in the largest forms first as simple geometric masses, then check silhouette and proportion from several angles before refining anything. Detail last, once the underlying form is right.
Useful tools: metal loop and rake tools for cutting back and shaping, silicone shapers for pushing and smoothing without leaving ridges, and simple wooden tools for blending.
Because the clay never dries, you can stop and resume indefinitely. A sculpture can sit for months and be picked up exactly where you left it — the reason it is preferred for long-running professional work.
Smoothing
Three approaches, from gentlest to strongest:
- Gentle heat. A hairdryer at a distance softens the very surface so tool marks flow out. Move constantly, or you will melt a hollow.
- Oil on a brush. Mineral oil or baby oil, sparingly. Softens the surface and blends marks, and leaves a slight sheen.
- 99 percent isopropyl alcohol on a soft brush. Dissolves the surface briefly and evaporates fast, leaving the crispest finish. The standard for final smoothing.
Fingerprints are the main enemy on a finished sculpt, and alcohol removes them in seconds.
It never hardens, and that is the point
Monster Clay is a mould master, not a finished object. To keep the sculpture you take a mould from it:
- Silicone rubber brushed or poured over the sculpt, supported by a plaster or fibreglass jacket for larger pieces, then cast in resin, plaster, foam latex or wax.
- Being sulphur-free matters here: sulphur inhibits the cure of platinum-based silicones, and a sulphur-bearing clay will leave you with a permanently tacky mould.
Once the mould is taken, the clay is scraped out, remelted, and used again. That reusability is a large part of why studios work this way.
Storage
Wrap it or box it and keep it away from dust, since dust embeds in the surface and is difficult to remove. Keep it out of direct heat so it does not slump. It has no shelf life at all — oil clay from decades ago is still perfectly usable, which cannot be said of any water-based clay.
Tools that suit oil clay
Oil-based clay responds to a different toolkit than water-based clay, mostly because you can cut it cleanly and it never dries on your tools.
Metal rake and loop tools. The workhorses. Rakes cut back a surface in controlled passes and leave a texture you can then smooth, which is far more accurate than pushing clay around with your thumbs.
Silicone shapers. Push and blend without leaving the fine ridges a metal tool leaves. Excellent for soft transitions.
Wooden tools. For blending and for pressing forms without scarring the surface.
A knife or a scalpel. Firm oil clay cuts like cheese, which makes crisp edges and undercuts straightforward — something water-based clay only allows briefly at leather-hard.
A heat gun or hairdryer. Effectively a tool in its own right, for softening a specific area rather than the whole piece.
Isopropyl alcohol and a soft brush. The finishing tool. It dissolves the very surface, removes fingerprints and evaporates in seconds.
Clean tools with a rag and a little mineral oil. Because nothing dries, tools left dirty for a month are no worse than tools left dirty for an hour.
Where to go next
For the general method that applies whatever the material, read how to sculpt with clay. To decide whether oil clay is the right choice at all, see what clay is best for sculpting. And what is a clay model in sculpture explains where the mould fits in.
