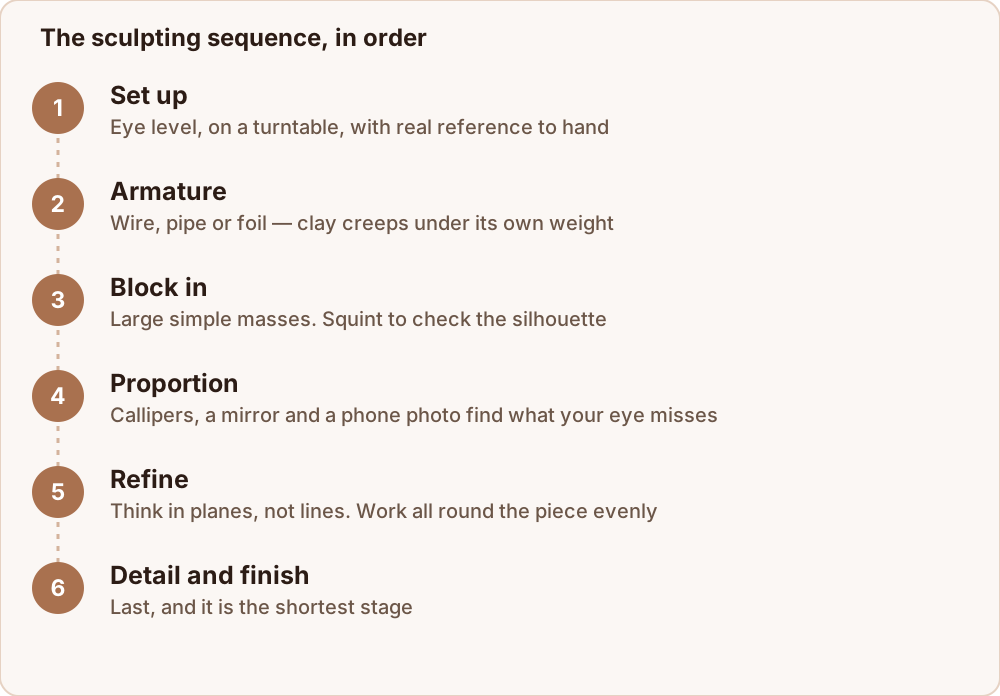
Sculpting is a sequence, and the sequence is the same whether you are making a thumb-sized figure or a life-size head. Most beginner difficulty comes from doing the stages in the wrong order — usually detailing far too early.
From the studio: Photographing a sculpture on my phone became the habit that improved my work fastest. A flat image strips away the three-dimensional cues my eye was using to excuse errors, and problems I had looked straight past for an hour are obvious in the photo within seconds.
0. Set yourself up
Work at eye level. A sculpture made looking down at a table will look wrong when it stands on a shelf, because you built in a viewing angle you will never use again. Raise it on a box, a turntable or a stand.
Be able to turn it. A lazy Susan costs little and changes everything. Sculpture is three-dimensional, and a piece that only ever gets seen from the front becomes a relief.
Have a reference. Multiple photographs from different angles, or better, a physical object. Working from imagination is the hardest possible mode, and even experienced sculptors work from reference.
1. Build an armature
Anything above hand size needs internal support. Clay is heavy and it creeps under its own weight over hours.
- Aluminium wire for figures and limbs; twist two lengths together for stiffness.
- A pipe and board stand for busts.
- Foil or foam to bulk out interior volume, saving clay and weight.
For ceramic clay that will be fired, use no permanent wire — build hollow, or over a paper core, or in halves that get joined.
2. Block in the big masses
Add clay in large, simple shapes: a sphere, a wedge, a cylinder. Do not smooth them. Do not refine them. You are looking for the gesture and the mass distribution, and both are easier to see in crude shapes than in half-finished ones.
Squint at it. Squinting removes detail and shows you the silhouette and the value structure, which is exactly what matters at this stage.
3. Fix the proportions
Now, before anything else, get the measurements right.
- Use callipers or a pencil held at arm's length to compare distances.
- Work in relationships, not absolutes: the width of the head compared to the width of the shoulders, the length of the forearm compared to the upper arm.
- Check the silhouette from at least four angles, and check it in a mirror. A mirror reverses the image and instantly reveals asymmetry your eye has stopped noticing.
- Photograph it on your phone and look at the photo. A flat image exposes errors that the three-dimensional object hides.
Every hour spent here saves three later. Proportion errors found after detailing mean destroying the detail.
4. Refine the secondary forms
Now the structure under the surface: the plane changes of a face, the ribcage and pelvis as separate masses, the way a sleeve hangs off a shoulder.
Think in planes, not lines. A face is a set of flat surfaces meeting at edges — forehead, temples, cheek planes, the sides and front of the nose. Getting the planes right is what makes a sculpture read as solid, and it matters far more than any individual feature.
Keep turning the piece. Work one area, rotate, work another. A sculpture developed evenly all round stays coherent; one that is finished at the front and rough at the back never quite recovers.
5. Detail last
Eyelids, lips, fingers, hair, texture, fabric weave. This stage is the fun one and it is the shortest.
Detail cannot rescue bad proportion — it draws attention to it. A well-proportioned figure with almost no surface detail reads as good sculpture; a badly proportioned one with beautifully modelled eyelashes reads as wrong, and viewers cannot always say why.
6. Finish the surface
Smooth, texture, or leave the tool marks. All three are legitimate choices and it is worth deciding deliberately rather than defaulting to smooth.
- Oil clay: 99 percent isopropyl alcohol on a soft brush, or gentle heat.
- Ceramic clay: a rubber rib at leather-hard, or a damp sponge.
- Polymer clay: rubbing alcohol on a brush before baking, sanding after.
The habits that matter most
Step back often. Every few minutes, physically move a couple of metres away. Errors invisible at arm's length are obvious across a room.
Rotate constantly. Never do more than a few minutes of work from one angle.
Take breaks. Coming back after a night away reveals mistakes your eye had normalised. This is not laziness; it is the most reliable error-detection method there is.
Work all over the piece. Resist finishing one area. Bring the whole sculpture along together at the same level of resolution.
Expect to remove clay. Cutting a form back and rebuilding it is normal practice, not failure. The loop tool gets as much use as your thumbs.
Common problems and what causes them
Most sculptural difficulties trace to one of a handful of causes, and naming them makes them fixable.
| What you see | Usual cause |
|---|---|
| It looks fine from the front, wrong from the side | You worked from one angle. Rotate every few minutes |
| Something is off but you cannot say what | Proportion. Check with callipers and in a mirror |
| The face reads as flat | You modelled features, not planes. Build the planes first |
| It looks stiff and lifeless | The gesture was lost during refinement. Squint at the silhouette |
| Detail looks fussy and unconvincing | Detail added before the underlying form was resolved |
| It sags or leans over hours | Not enough armature, or too much clay on a thin support |
| You keep fixing the same area | You have stopped seeing it. Leave it a day |
The pattern in that table is worth noticing: almost every entry is a sequencing problem rather than a skill problem. Working large to small, checking proportion before refining, and refining before detailing prevents most of them outright — which is why the order of the stages matters more than how good your hands are.
Where to go next
To choose a material first, read what clay is best for sculpting. For figures specifically, how to make clay figures covers armatures, hollowing and joins. And what is a clay model in sculpture explains what happens to the clay afterwards.
