There is no best sculpting clay in the abstract. There is a best clay for a specific combination of scale, permanence, detail and equipment. Answer four questions and the choice makes itself.
From the studio: The advice I give most often is to use one block of oil clay for a whole year. Removing the cost of every experiment, and the pressure of drying time, does more for a developing sculptor than any upgrade in material.
- Does it need to survive as a finished object, or will it be moulded?
- How big is it?
- How much fine detail does it carry?
- Do you have a kiln?
Oil-based clay — the professional default
Examples: Monster Clay, Chavant NSP, Plastilina, Plasticine.
Why it wins: it never dries. There is no time pressure at all, so a sculpture can sit for months and be resumed exactly as it was. It holds fine detail, it is fully reusable, and heat controls its softness — warm to block in masses, cool to detail.
The catch: it never hardens. A finished sculpture is a mould master, not a finished object. To keep it you take a silicone mould and cast in resin, plaster or wax.
Choose it for: learning, portrait and figure work, prop and character sculpture, anything destined for casting, and anything you expect to rework repeatedly.
Buy sulphur-free if there is any chance of moulding it in platinum silicone, since sulphur inhibits the cure.
Polymer clay — small, detailed, keepable
Examples: Sculpey, Fimo, Premo, Cernit.
Why it wins: it hardens permanently in a domestic oven, holds extremely fine detail, comes in every colour, and needs no kiln.
The catch: cost and scale. It is expensive by weight, and large pieces need a foil armature to keep walls thin, because thick sections cure unevenly and crack. Colour choices are permanent, and overbaking scorches.
Choose it for: figurines, miniatures, jewellery, doll heads, anything under about 15 cm that you want to keep as it is.
Ceramic sculpture clay — fired, permanent, large
Examples: any heavily grogged stoneware or sculpture body.
Why it wins: fired ceramic sculpture lasts for millennia. Grogged bodies handle thick sections, uneven drying and large scale far better than throwing clay, and the surface can be glazed or left raw.
The catch: a kiln, and real discipline about hollowing. Every enclosed form must be pierced, walls should stay reasonably even, and drying must be slow. It also shrinks 10 to 14 percent from wet to fired, which matters if the piece must fit something.
Choose it for: garden and outdoor sculpture, gallery work, anything large and permanent — if you have kiln access.
Ask a supplier for a "sculpture body" or "handbuilding body" rather than a throwing clay. The extra grog is exactly what you want.
Air-dry clay — cheap and large, structurally weak
Why it wins: no kiln, no oven, low cost, and you can work at scale without special equipment.
The catch: it is genuinely weak. It chips, it is never waterproof, and thick pieces crack as they dry. Detail is moderate at best.
Choose it for: school projects, practice at scale, lightweight decorative work over an armature, and anything where cost matters more than durability.
Build over a crumpled foil core, keep walls under 1 cm, and dry slowly under a loose plastic tent for the first day.
Wax and epoxy putty — the specialists
Sculpting wax for jewellery, where the piece will be cast in metal by lost-wax casting. Carves crisply and takes exceptional detail.
Epoxy putty — Milliput, Green Stuff, Apoxie Sculpt — for miniatures, repairs and any small detail that needs to be rock hard and self-supporting. It cures chemically in a few hours, bonds to almost anything, and can be drilled and tapped. Working time is short, which is the whole discipline of using it.
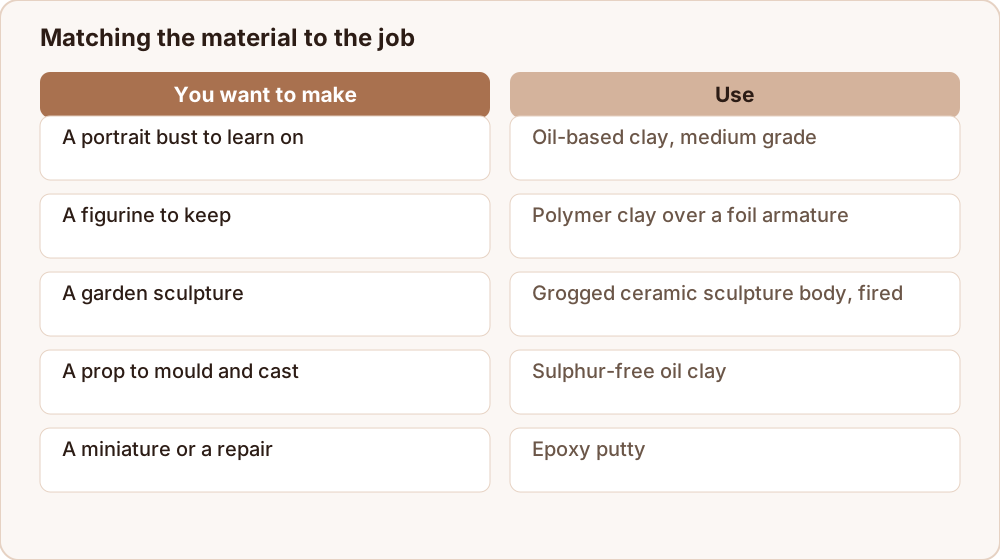
Quick answers
| You want to make | Use |
|---|---|
| A portrait bust to learn on | Oil-based clay, medium grade |
| A figurine to keep | Polymer clay over a foil armature |
| A garden sculpture | Grogged ceramic sculpture body, fired |
| A prop to mould and cast | Sulphur-free oil clay |
| A school project | Air-dry clay |
| A miniature or a repair | Epoxy putty |
| A ring or pendant to cast in silver | Carving wax |
The advice under the advice
If you are learning to sculpt rather than trying to produce a specific object, use oil-based clay and reuse the same block for a year. Removing the pressure of drying time, and the cost of every experiment, is worth more to a developing sculptor than any property of a fancier material.
What you actually need to buy alongside it
Material choice tends to dominate the conversation, and the supporting kit matters almost as much.
A turntable. A cheap lazy Susan is the highest-value purchase in sculpture, because it makes turning the piece effortless and turning is what keeps a sculpture coherent from every angle.
Armature wire. Aluminium, 2–3 mm for small figures. Cheap, bends by hand, holds its shape.
Aluminium foil. For bulking out interior volume. It saves clay, weight and curing problems all at once.
Three tools, not thirty. A wire loop for cutting back, a wooden or silicone tool for blending, and a knife. Large sets are mostly unused drawer filler.
Callipers. Even cheap plastic ones. Proportion errors are the difference between a sculpture that reads and one that does not, and callipers find them in seconds.
A mirror. Free, and it reverses the image so asymmetry your eye has learned to ignore becomes obvious instantly.
Total outlay is small, and none of it depends on which clay you chose.
Where to go next
Once you have picked a material, how to sculpt with clay covers the working sequence. For oil clay specifically, see how to use Monster Clay. And if you chose ceramic, stoneware, porcelain or earthenware narrows the body down.
