Polymer clay has no water in it. It is PVC particles suspended in liquid plasticiser, which is why it never dries out on the table and why the storage problems it does have are unlike those of any other clay.
From the studio: I left a conditioned sheet on a clear plastic lid overnight and came back to find both fused into one sticky, unusable object. Now everything sits on a ceramic tile, which cleans in seconds and goes straight into the oven with the piece still on it.
Three things degrade it: heat, light, and contact with the wrong plastics.
Heat is the real enemy
Polymer clay begins to cure at around 110 °C, and it starts to firm up well below that. A block left in a car in summer, on a windowsill, on top of a radiator, or in a loft can partially cure — and once part of a block has cured, that part is permanently hard and no amount of kneading brings it back.
Store it somewhere that stays reliably cool: a cupboard, a drawer, a box under a bed. A cool room is fine; refrigeration is unnecessary. If you do keep clay in a fridge, seal it well, because condensation on cold clay is a nuisance when it comes out.
Light matters too
Ultraviolet light degrades the polymer over time and fades colours, particularly reds, purples and translucents. Opaque containers or a dark cupboard solve this completely.
The plastics problem
Plasticiser is a solvent, and it attacks some plastics on contact. Leave clay on a polystyrene surface overnight and you will find it has welded itself into a sticky mess that ruins both.
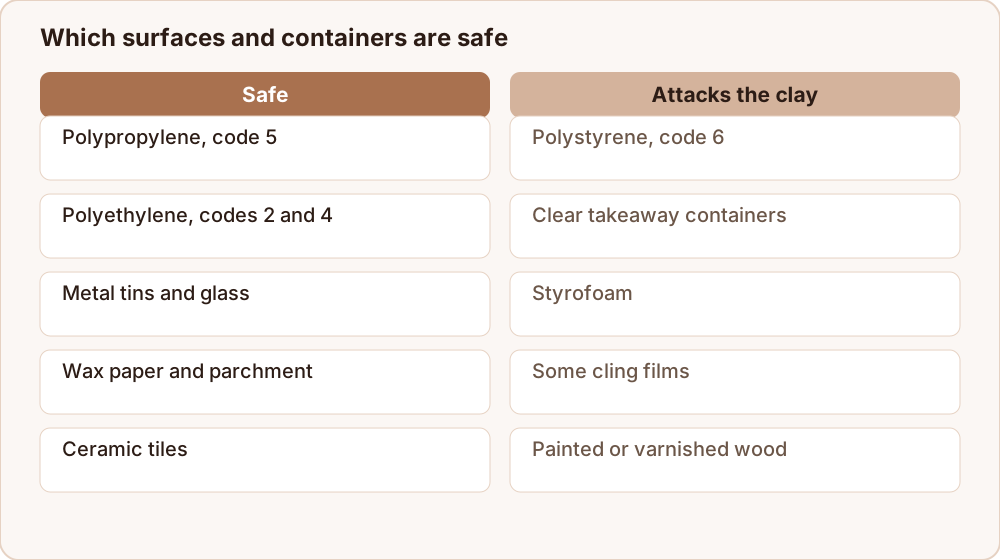
Safe: polypropylene (recycling code 5), polyethylene (codes 2 and 4), metal tins, glass, ceramic tiles, wax paper, parchment paper, and the manufacturer's own packaging.
Not safe: polystyrene (code 6), many clear disposable takeaway containers, styrofoam, some cling films, and painted or varnished wooden surfaces.
When in doubt, check the recycling triangle on the base. Number 5 is your friend.
Storing opened blocks
The manufacturer's plastic film is designed for the job. If it has torn, wrap the block in wax paper or baking parchment — both are inert — and then put it in a tin or a number 5 box.
Do not wrap clay in cling film for long-term storage; many varieties are not compatible and it can bond to the surface.
Keep colours separated. Polymer clay picks up colour from anything it touches, and a white block that spent a month next to red is now a pink block.
Storing mixed colours and small pieces
Custom colour blends are worth protecting, because remixing an exact shade is nearly impossible.
- Flatten each blend into a thin sheet, wrap it in parchment, and label it with the recipe — for example "2 parts white, 1 part crimson, pinch of black".
- Store sheets flat in a shallow tin. Sheets are easier to condition later than balls.
- Small offcuts go in a single "scrap" tin. Mixed scraps eventually blend into a usable grey-brown that is perfectly good for armatures and hidden interiors.
Storing canes
Millefiori canes are the hardest thing to store well, because pressure distorts the pattern.
- Rest them on a flat surface, not on their ends.
- Do not stack anything on top.
- Wrap in parchment and store in a shallow rigid box.
- Rotate a quarter turn occasionally if they will sit for months, so one side does not flatten.
Slightly firm canes actually slice more cleanly than fresh ones, so a short rest is beneficial. Months of pressure is not.
Reviving old clay
Clay that has gone crumbly has lost plasticiser, not water. Adding water does nothing at all.
What works:
- Knead thoroughly. Warmth from your hands recovers a lot of clay that only seems hard. Give it a genuine five minutes before deciding it is dead.
- Add clay softener (sometimes sold as clay conditioner or diluent), a few drops at a time, kneaded in fully. Overdoing it makes clay sticky and slumpy, and that is harder to fix than crumbly.
- Blend in fresh clay, roughly one part fresh to two or three parts old.
- Chop and rest. Grate or chop the hard clay finely, add a few drops of softener, seal it in a bag, and leave it a few days. The plasticiser redistributes on its own.
A block that has partially cured from heat exposure is genuinely finished. You will know because part of it stays hard and gritty no matter how long you knead. Use it chopped as filler inside larger pieces.
A note on workspace, not storage
The same plastic compatibility rules apply to your working surface. A ceramic tile, a sheet of glass, or a piece of parchment on the desk are all safe, easy to clean, and can go straight into the oven with the piece still on them — which is also the least stressful way to move a finished sculpture without denting it.
Setting up a workspace that does not cost you clay
Storage failures and workspace failures are the same failure, and a few choices remove both.
Work on a ceramic tile. Cheap, perfectly flat, immune to plasticiser, wipes clean in seconds, and it goes straight into the oven with the piece still on it — which means you never have to lift a finished raw sculpture and dent it.
Keep colours apart. Polymer clay picks up pigment from anything it touches, including your hands. Wipe your hands with rubbing alcohol or a baby wipe between colours, and always work light colours before dark ones.
Have a scrap tin. Offcuts eventually blend into a serviceable grey-brown that is ideal for armature cores and hidden interiors. Nothing needs throwing away.
Label your blends. Flatten custom colours into sheets, wrap in parchment, and write the ratio on the wrapper. Recreating an exact shade from memory is essentially impossible.
Keep it out of the sun. A windowsill in summer will part-cure a block and fade the colours, and part-cured clay is the only kind that cannot be revived.
Where to go next
For getting the block workable again, how to sculpt with polymer clay covers conditioning properly. When it comes to curing, baking polymer clay without burning is the post to read. And if you are still choosing a material, see is modeling clay the same as polymer clay.
